Creating beautiful bows with velvet ribbon has become an increasingly popular craft among DIY enthusiasts. Whether you're decorating gifts, making hair accessories, or adding a touch of elegance to your holiday decor, velvet bows offer a timeless charm. This comprehensive guide will walk you through the process of crafting a stunning velvet ribbon bow step by step.
Velvet ribbon is known for its luxurious texture and vibrant colors, making it an ideal choice for crafting. Learning how to make a bow with velvet ribbon not only enhances your creative skills but also allows you to personalize gifts and accessories in a unique way. In this article, we will explore everything from basic techniques to advanced tips for creating professional-looking bows.
Whether you're a beginner or an experienced crafter, this guide will provide you with all the tools and knowledge needed to master the art of velvet ribbon bow-making. So, gather your materials and get ready to create something truly special!
Read also:Mary Hill Dumplings Recipe A Classic Delight Unveiled
Table of Contents
- Introduction to Velvet Ribbon
- Tools and Materials Needed
- Basic Steps to Make a Bow
- Choosing the Right Velvet Ribbon
- Advanced Bow-Making Techniques
- FAQs About Making Bows
- Styling Your Bows
- Common Mistakes to Avoid
- Tips for Beginners
- Conclusion
Introduction to Velvet Ribbon
Velvet ribbon is a versatile material that has been used in crafting for centuries. Its soft, plush texture and rich appearance make it a favorite among crafters worldwide. Velvet ribbon is particularly popular during the holiday season, as it adds a touch of elegance and sophistication to any project.
Why Choose Velvet Ribbon?
There are several reasons why velvet ribbon is an excellent choice for making bows. Firstly, its texture holds its shape well, ensuring that your bows maintain their form even after extended use. Secondly, velvet ribbon comes in a variety of colors, allowing you to match your bows to any theme or occasion. Lastly, its durability makes it a practical choice for long-lasting decorations.
Whether you're creating bows for gift wrapping, home decor, or fashion accessories, velvet ribbon offers a luxurious and professional finish that is hard to replicate with other materials.
Tools and Materials Needed
Before you start making your velvet ribbon bow, it's essential to gather all the necessary tools and materials. Having everything ready will ensure a smooth crafting process and help you achieve the best results.
- Velvet ribbon (choose the width and color that suits your project)
- Scissors (sharp and precise for clean cuts)
- Wire-edged ribbon (optional, for added structure)
- Hot glue gun and glue sticks
- Floral wire or ribbon wire (for securing the bow)
- Ruler or measuring tape (for precise measurements)
Read also:Discover The Charm Of Light Skin Dog With Beard
Optional Accessories
Depending on your project, you may also want to consider adding extra embellishments to your bow:
- Beading or sequins for added sparkle
- Fabric flowers or leaves for a more elaborate design
- Small charms or trinkets for a personalized touch
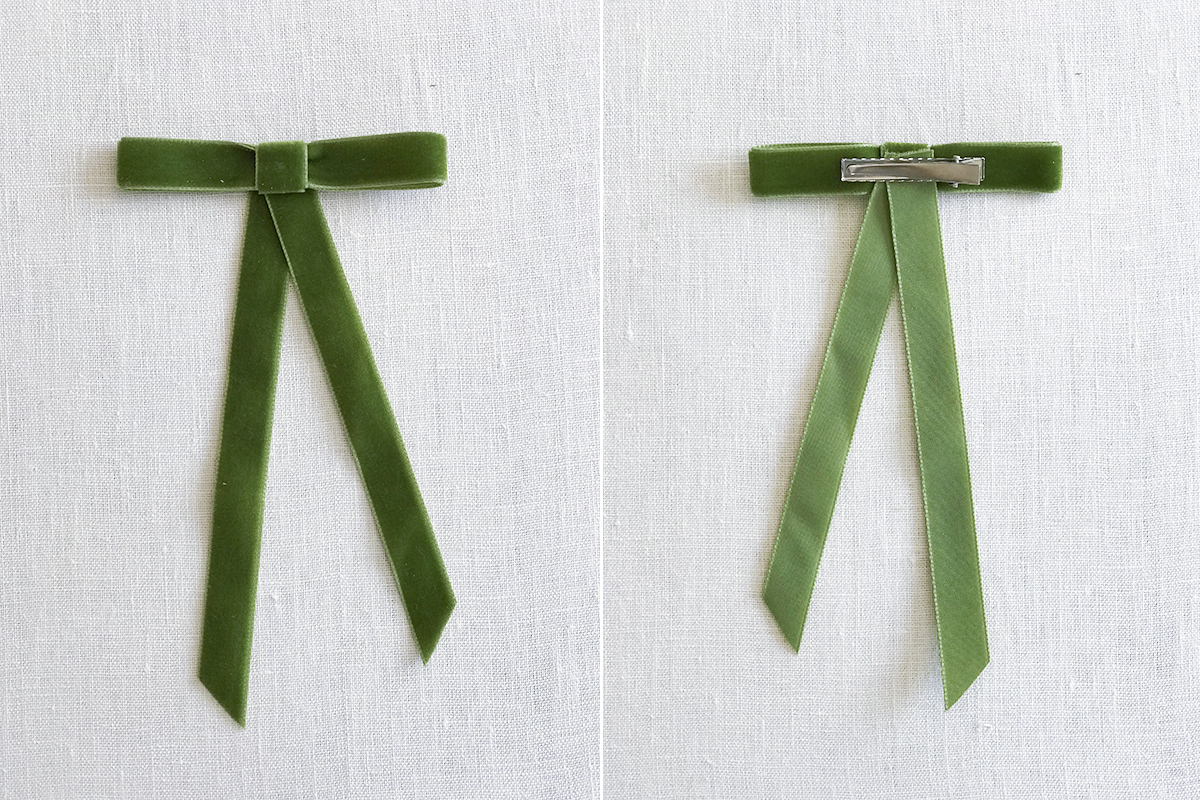
Basic Steps to Make a Bow
Now that you have all your materials ready, let's dive into the basic steps for making a bow with velvet ribbon. This method is perfect for beginners and can be adapted for more complex designs as you gain experience.
Step 1: Measure and Cut Your Ribbon
Decide on the size of your bow and measure the appropriate length of ribbon. A good rule of thumb is to cut your ribbon at least three times the desired width of your bow. For example, if you want a 6-inch bow, cut a piece of ribbon that is 18 inches long.
Step 2: Create the Loops
Fold the ribbon in half to form a loop. Hold the two ends of the ribbon together and adjust the loop size to your preference. Repeat this process to create additional loops, alternating the direction of each loop to form the bow shape.
Step 3: Secure the Center
Once you have the desired number of loops, gather them together at the center and secure them tightly with floral wire or ribbon wire. Twist the wire securely to ensure the loops stay in place.
Choosing the Right Velvet Ribbon
Selecting the right velvet ribbon is crucial for achieving the desired look and feel of your bow. Consider the following factors when choosing your ribbon:
- Width: The width of the ribbon will determine the size and proportion of your bow. Wider ribbons are better suited for larger projects, while narrower ribbons work well for smaller accessories.
- Color: Choose a color that complements your project or matches the occasion. Velvet ribbon is available in a wide range of colors, including classic shades like red, green, and gold, as well as trendy hues like blush and navy blue.
- Texture: Ensure the velvet ribbon has a smooth, plush texture that holds its shape well. Avoid ribbons that are too stiff or too soft, as they may not form the loops properly.
For added structure, consider using wire-edged velvet ribbon. This type of ribbon has a thin wire embedded along the edges, allowing you to create more defined loops and tails.
Advanced Bow-Making Techniques
Once you've mastered the basics, you can experiment with advanced techniques to create more intricate and professional-looking bows. Here are a few ideas to take your bow-making skills to the next level:
Layered Bows
Layering multiple bows on top of each other creates a fuller, more dimensional look. Start with a larger bow as the base and add smaller bows on top, securing them with floral wire. You can also use ribbons of different widths and colors to add variety.
Asymmetrical Designs
Break away from traditional symmetrical bows by experimenting with asymmetrical designs. Create loops of varying sizes and arrange them in an uneven pattern for a more modern and artistic look.
FAQs About Making Bows
Here are some frequently asked questions about making bows with velvet ribbon:
Q: Can I use velvet ribbon for outdoor decorations?
A: While velvet ribbon is durable, it is not weatherproof. If you plan to use your bows outdoors, consider applying a protective spray or using a weather-resistant ribbon instead.
Q: How do I prevent the edges of the ribbon from fraying?
A: To prevent fraying, use a lighter or candle to gently melt the edges of the ribbon. Be careful not to burn the ribbon, as this can damage its texture.
Styling Your Bows
Once you've created your bow, it's time to style it according to your project's needs. Here are a few ideas for incorporating velvet ribbon bows into different settings:
- Gift Wrapping: Add a velvet ribbon bow to the top of a gift box for a luxurious touch.
- Home Decor: Use bows to embellish wreaths, garlands, or Christmas trees.
- Fashion Accessories: Attach bows to hairbands, headbands, or barrettes for a stylish hair accessory.
Experiment with different placements and sizes to find the perfect look for your project.
Common Mistakes to Avoid
Even experienced crafters can make mistakes when creating bows. Here are a few common errors to watch out for:
- Improper Measurements: Cutting the ribbon too short can result in a bow that is too small or lacks volume. Always err on the side of caution and cut slightly longer pieces.
- Loose Loops: Ensure that each loop is pulled tightly before securing the center. Loose loops can cause the bow to look messy or uneven.
- Overcrowding: Avoid adding too many embellishments to your bow, as this can detract from its elegance. Stick to a few key elements for a polished look.
Tips for Beginners
If you're new to bow-making, here are a few tips to help you get started:
- Practice with cheaper ribbons before moving on to more expensive materials.
- Watch tutorials or follow step-by-step guides to improve your technique.
- Experiment with different ribbon types and textures to find what works best for you.
Remember, practice makes perfect! The more you craft, the more confident you'll become in creating beautiful bows with velvet ribbon.
Conclusion
Learning how to make a bow with velvet ribbon is a rewarding and creative endeavor that can enhance your crafting skills and add beauty to your projects. By following the steps outlined in this guide, you can create stunning bows that are both elegant and professional-looking.
Now that you've learned the basics and some advanced techniques, it's time to put your newfound knowledge into practice. Share your creations with friends and family, and don't forget to leave a comment or share this article if you found it helpful!
For more crafting tips and tutorials, explore our other articles and continue honing your skills. Happy crafting!